


You are walking through a compressor room between scheduled maintenance tasks. The plant is loud enough that a small air leak blends into the background. A duct damper is rattling above the ceiling line. In the electrical room, a cabinet deserves a closer look, but shutting down equipment for every suspicion is not realistic.
This is where a structured acoustic imaging walkdown can turn scattered observations into repeatable inspection evidence. A camera can locate sound sources, but the program around it determines whether a finding becomes a repair decision, a safety follow-up, or just another saved screenshot.
 Acoustic imaging helps maintenance teams turn sound sources into visual inspection evidence.
Acoustic imaging walkdown: A repeatable field inspection route where technicians use an acoustic camera to visualize sound sources, capture evidence, tag findings, and support maintenance decisions for leaks, partial discharge screening, HVAC noise, and other abnormal sound events.
Why Daily Walkdowns Miss Problems That Acoustic Imaging Can See
Traditional walkdowns rely on hearing, experience, and line-of-sight access. That works for obvious failures, but many early-stage problems are quiet, intermittent, ultrasonic, or hidden by plant noise.
Compressed air leaks are a good example. A fitting may leak above the normal hearing range, especially in a production area with motors, fans, conveyors, and ventilation noise. Acoustic imaging shows a sound map over the visual scene, so the inspection depends less on direct hearing.
Partial discharge screening is another useful case. Acoustic imaging should not replace electrical diagnostic methods, but it can help identify suspicious areas around switchgear cabinets, bus ducts, terminations, and insulators before deeper follow-up testing is scheduled.
HVAC troubleshooting benefits for a different reason: the sound is often audible, but the source is hard to isolate. A visual sound map helps narrow the search around dampers, ducts, grilles, fans, and panels.
What an Acoustic Imaging Walkdown Should Cover
Do not start by scanning everything. A good daily program separates target problems by sound behavior, asset type, risk, and expected action.
| Inspection area | Typical target | What to capture | Recommended action |
|---|---|---|---|
| Compressed air, gas, and vacuum lines | Fittings, valves, manifolds, hoses, regulators | Sound image, distance, location tag, photo or video | Repair if accessible; quantify or prioritize if multiple leaks are found |
| Electrical assets | Switchgear, bus ducts, terminations, insulators | Sound image, cabinet ID, distance, scan angle, operating condition | Treat as screening evidence; route to qualified electrical follow-up |
| HVAC and building systems | Duct joints, dampers, grilles, fans, panels | Sound image, operating mode, airflow condition, room location | Confirm mechanically, then adjust, seal, tighten, or schedule service |
| Production equipment | Bearings, pumps, pneumatic tools, abnormal noise points | Sound image, frequency band, operating state, repeatability | Compare with baseline and escalate if persistent |
| Hard-to-reach assets | Overhead pipe racks, elevated fittings, enclosed machinery | Wide scan, close scan if safe, angle comparison | Use as a lead for safe access planning |
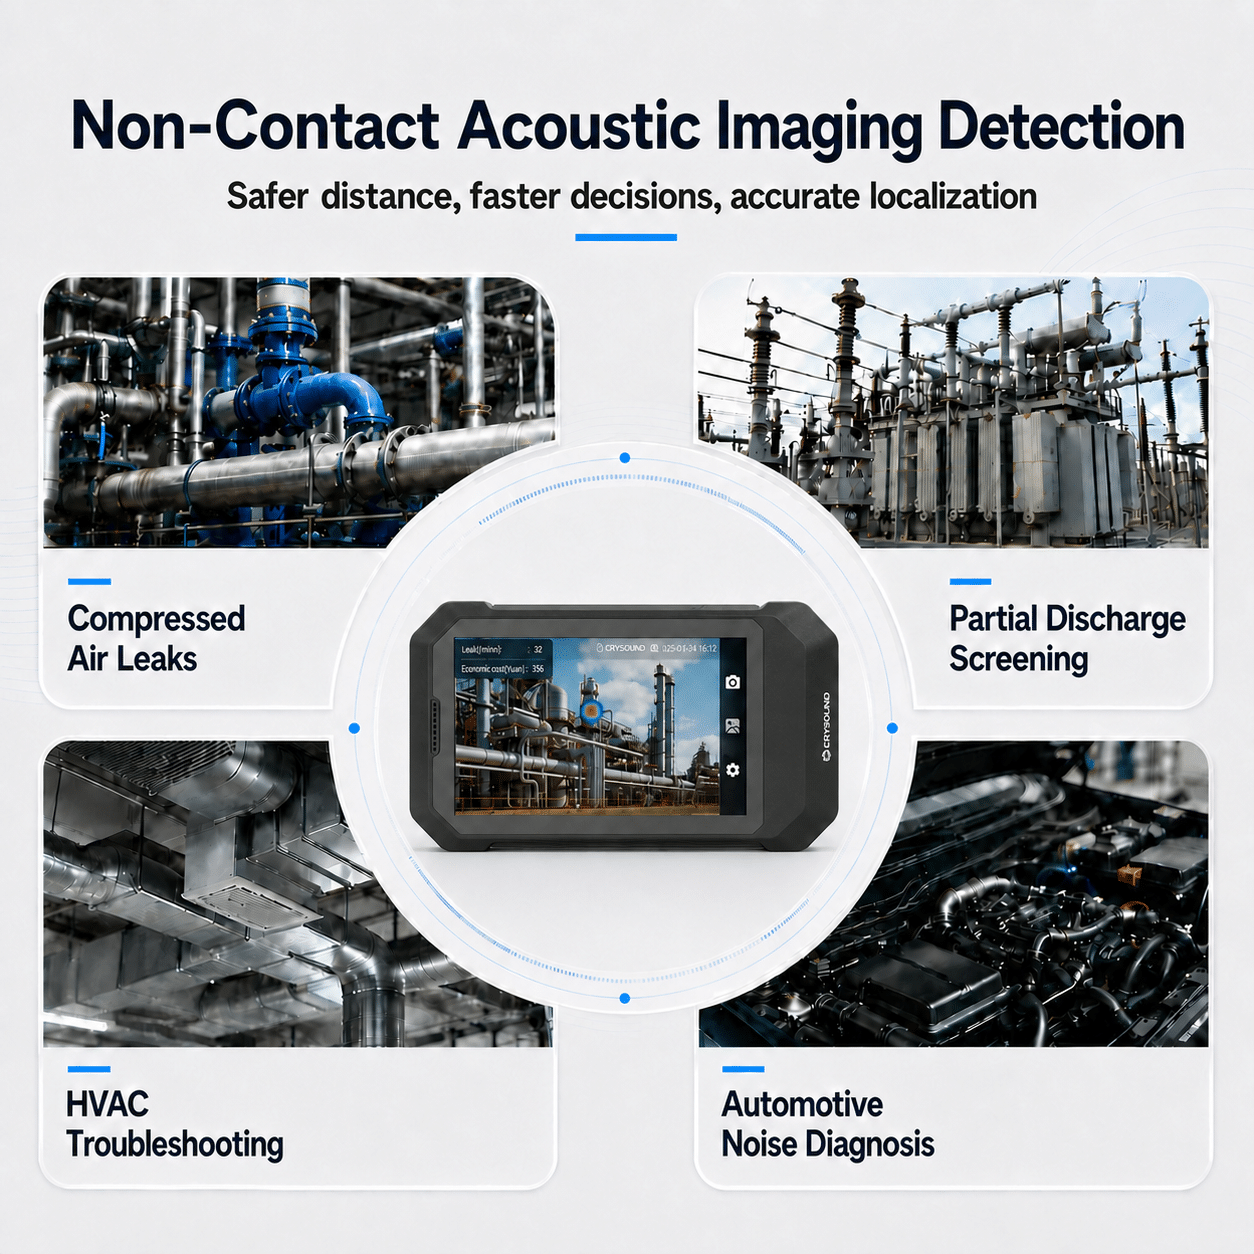
For training, this table matters more than a long theory lesson. New users need to know what to scan, what evidence to save, and what action the finding should trigger.
Step-by-Step Workflow: From Scan to Repair Decision
The strongest walkdown programs are simple enough to repeat every day. A practical workflow looks like this:
- Define the route. Build a short route around high-value assets: compressor rooms, compressed air headers, electrical rooms, HVAC plant rooms, and known noise complaint areas.
- Set the inspection goal before scanning. Decide whether the scan is for leak discovery, PD screening, HVAC troubleshooting, or general abnormal noise.
- Start with a wide scan. Stand at a safe, stable location and sweep the area slowly. Look for stable hotspots tied to physical assets.
- Confirm from a second angle. Move laterally and scan again. Real sources usually stay attached to the same physical location.
- Capture evidence immediately. Save the sound image, visual photo, short video, or audio record while the operating condition is still present.
- Classify the finding. Use simple categories such as "confirmed leak," "suspected PD for follow-up," "HVAC noise source," "background noise," or "needs re-scan."
- Prioritize the action. Tie every finding to an owner, priority level, and next step.
- Close the loop. After repair or follow-up testing, re-scan the asset and attach before-and-after evidence to the same record.
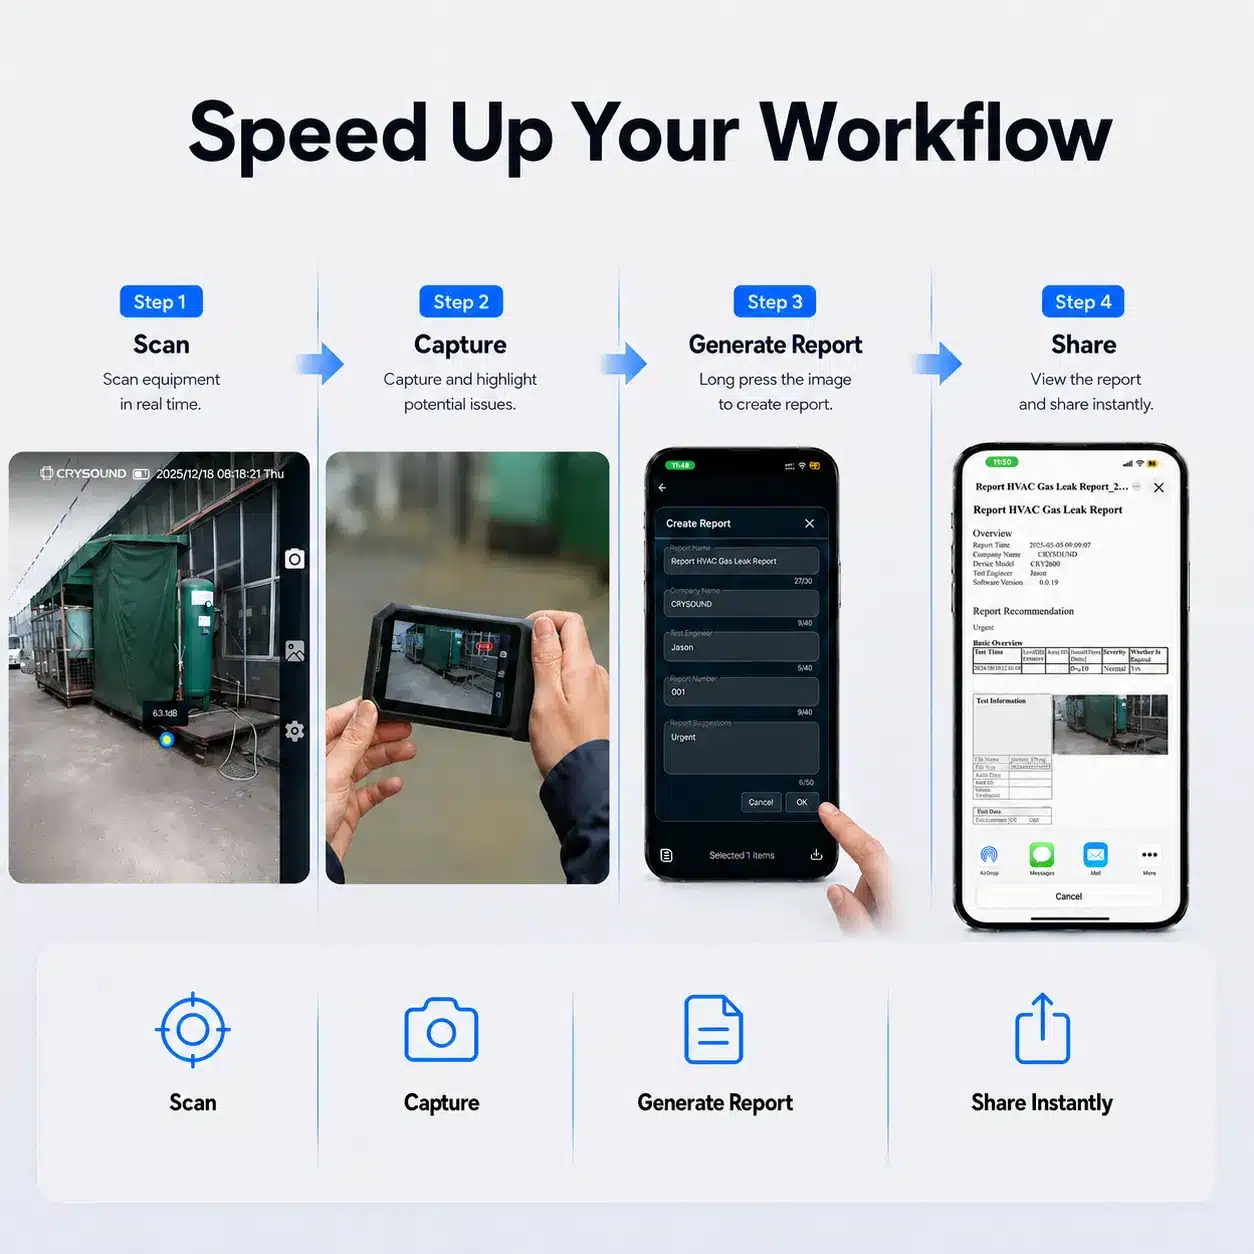
This is where daily walkdowns become more than detection. They create a record that maintenance, energy, and facility teams can act on.
How to Avoid Misreading the Sound Map
An acoustic camera does not remove the need for judgment. Industrial environments still contain reflections, overlapping machinery noise, and sources outside the selected target.
Before logging a finding, ask three questions:
- Does the hotspot stay in the same physical place when I change angle? If not, it may be a reflection.
- Does the frequency content match the target problem? Compressed air leaks often show broadband ultrasonic energy, while machinery noise may appear more tonal.
- Can I isolate the area? If the device supports frequency filtering, focus, or region-of-interest controls, use them to separate the target from surrounding noise.
For a deeper field guide, link the inspection team to CRYSOUND's article on acoustic imaging false positives, reflections, and beamforming artifacts. Treat false positive recognition as operator training, not as an advanced topic reserved for specialists.
Choosing the Right Pocket Acoustic Camera Workflow
The right tool depends on what the walkdown needs to produce. For quick daily checks, the camera should be light, fast, and easy to carry. For repair prioritization and audits, the workflow also needs quantified evidence and standardized reporting.
CRYSOUND introduced the CRY8020 Series SonoCam Pocket Acoustic Camera for daily walkdowns, leak detection, and partial discharge screening. In that family, the CRY8024 SonoCam Pocket Acoustic Camera is suited to quick location and quick reporting: it is a 270 g pocket acoustic camera with a 64 MEMS microphone array, 0.3 to 120 m inspection range, photo/video capture, auto frequency selection, ultrasonic listening, and mobile-friendly data sharing.
When the program needs more complete leak documentation, the CRY8025 SonoCam Pocket Pro Acoustic Camera adds a stronger reporting workflow. Its product page describes leak rate quantification, economic loss estimates, professional reports, 32 GB internal storage, and USB-C or Wi-Fi data export.
That difference matters operationally. A frontline technician may need to locate and document a leak in seconds. An energy manager may need to rank leaks by expected loss before approving repair work. A maintenance supervisor may need a report clear enough to attach to a work order.
What to Put in the Inspection Report
A useful acoustic imaging report should be short enough to read and complete enough for decisions.
At minimum, include:
- Asset ID, location, inspection date, and operator
- Target issue category and operating condition
- Distance, scan angle, and frequency range, if available
- Sound image and visual reference image
- Finding classification, priority, and recommended next action
- Repair status and re-scan result
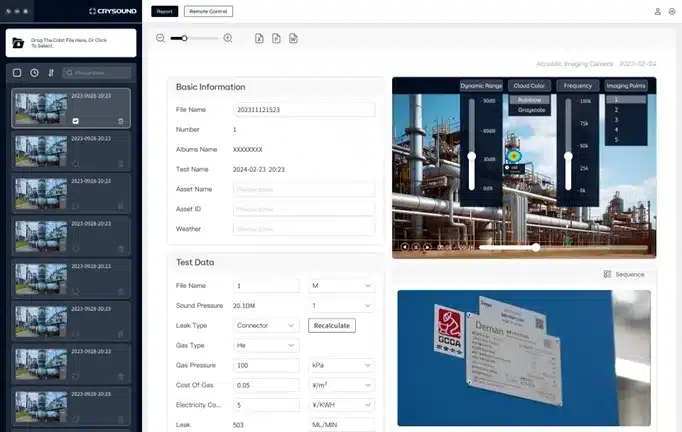
For leak programs, add estimated leak rate, estimated annualized loss, repair owner, and before-and-after verification. For PD screening, avoid overstating the result unless the conclusion is supported by the required diagnostic process.
Common Mistakes in the First Month
The first month of deployment usually determines whether acoustic imaging becomes a habit or a tool that stays in a cabinet. Watch for four mistakes:
- Scanning without a route, which creates isolated discoveries instead of trendable data.
- Treating every hotspot as confirmed, instead of checking angle, frequency, and repeatability.
- Saving evidence without ownership, priority, or a next action.
- Using the same decision language for leaks, PD screening, and HVAC noise.
Finally, do not skip repair verification. The most persuasive evidence is not the first hotspot. It is the before-and-after record showing that the action changed the acoustic condition.
FAQ
What is an acoustic imaging walkdown?
It is a repeatable field inspection route where technicians use an acoustic camera to visualize sound sources, capture evidence, classify findings, and support maintenance decisions.
Can acoustic imaging replace ultrasonic leak detectors?
It can speed up leak location by showing the source on a visual image, especially in complex or noisy areas. Some teams still use contact probes, soap tests, or follow-up measurements for confirmation or repair validation.
Can a pocket acoustic camera detect partial discharge?
Yes, as screening support. A pocket acoustic camera can visualize suspicious ultrasonic sound sources around electrical assets, but potential issues should be routed to qualified electrical follow-up.
How often should maintenance teams run acoustic imaging inspections?
For high-air-use production areas, compressor rooms, and known problem zones, a short daily or weekly route is practical. Electrical rooms and HVAC systems may follow a weekly, monthly, or condition-based schedule.
What should be included in an acoustic imaging report?
Include the asset ID, location, inspection date, operator, target issue, operating condition, sound image, visual image, classification, priority, recommended action, and repair verification result.
Make Walkdowns Repeatable
The value of acoustic imaging is not only that it makes sound visible. It makes sound evidence shareable. When technicians follow a defined route, verify ambiguous hotspots, and connect each finding to a next action, daily walkdowns become a practical part of preventive maintenance.
Start small: one compressor room, one electrical room, and one HVAC route. Review the first month of findings, improve the report format, and keep the workflow simple enough that technicians actually use it.
Ready to build a practical acoustic imaging inspection workflow? Fill out the Get in Touch form below to discuss your leak detection, PD screening, and HVAC troubleshooting routes with a CRYSOUND application engineer.


